
 It may look like a mild banana pepper, but the Hungarian wax pepper has a lot more bite. In terms of spiciness, it’s more akin to a jalapeño with a chance for a bit more heat. This is a great pepper for all sorts of cooking, including chiles rellenos, and a popular choice to top a salad or to pickle. They are very flavorful and slightly tangy-sweet with that mild heat layered on top. These chilies originated in − surprise − Hungary! It couldn’t have a more fitting name, but it does go by a few others. Sometimes it’s simply known as the hot wax pepper or the hot yellow pepper. The other aspect of the name refers to the waxy-like texture of the pepper’s rind. Hungarian wax peppers do change color as they ripen, turning orange in hue, followed by red at full ripening. Storage & PreparationFresh, unwashed peppers can be stored in the vegetable drawer of your fridge for 7-10 days. To avoid the peppers drying out in the crisper, it sometimes helps to put a damp paper towel in the drawer to keep the air moist. To prepare your peppers, wash them with cold running water. Use a small paring knife to cut out the stem and core of the pepper. Remove the seeds by rinsing the pepper under cold water again. Cooking Ideas
Recipes
0 Comments
Blackberries and raspberries and blueberries, oh my! Summer berries are at the peak of freshness from July through September in Western New York. Not only are they at their highest quality, you'll pay less for these gem-colored fruits when they are locally sourced. Berries are high in vitamin C and other antioxidants that may protect cells in your body. They are also fat free and high in dietary fiber. Cooking Ideas
BlackberriesBlackberries range from sweet to tart, which makes them versatile fruits for baking, cooking and jamming. Storage & Preparation Keep blackberries refrigerated in a covered shallow container and use within 3-5 days. You can freeze whole blackberries on a tray until firm and package in freezer containers or resealable plastic bags. Label with date and use within 8-12 months for best quality. Rinse berries under cool running water just before using. Moisture during storage speeds spoilage. Recipes RaspberriesRaspberry derives its name from raspise, "a sweet rose-colored wine." They are sweet and can be enjoyed fresh, whole and on their own. They also make great cakes and cake toppers. Storage & Preparation Do not wash raspberries until ready to eat. Raspberries are very perishable and should not be exposed to the sun or warm temperatures for a long period of time. Refrigerate for use within 1-2 days. To freeze, place the berries in the freezer on a single layer on a cookie sheet. Wash the raspberries under cold water when you are ready to eat them. Recipes BlueberriesBlueberries are one of the few fruits native to North America. Native Americans once called them “star berries” because the five points of blueberry blossoms make a star shape. During the Civil War, blueberries were packaged and shipped to the Union troops for use as a food staple. Blueberries contain more antioxidants than most other fruits or vegetables. Increased intake of antioxidants has been linked to a decreased risk of cancer, heart disease, and Alzheimer's. Storage & Preparation As with most types of berries, it is best to eat blueberries as soon as possible. Blueberries will store well in the fridge if you can’t eat them immediately. Place them in a covered container and store in your vegetable crisper where the humidity is high and will prevent the blue-berries from drying out. Be sure to remove any mushy or moldy blue-berries before putting them in the fridge. When you are ready to use, gently swish berries under water in a colander and then allow the berries to drain. Recipes Black RaspberriesBlack raspberries are a special variety of the more common red raspberry. Botanically, black raspberries and blackberries are related, but they’re completely different fruits. Black raspberries have a very short growing season, while blackberries are more widely available year-round.
Black raspberries have a unique flavor. They are sweeter and not as tart as blackberries. Black raspberries make great jams. In addition to having a bright, fruity taste, these berries are also considered one of the healthiest berries on the planet. Storage & Preparation Do not wash raspberries until ready to eat. Raspberries are very perishable and should not be exposed to the sun or warm temperatures for a long period of time. Refrigerate for use within 1-2 days. Recipes 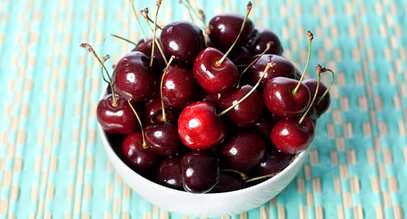 Cherries, arguably the most highly anticipated fruit of the summer, are at their best eaten out of hand. Although they can also lend their subtle but unmistakable flavor to any number of sweet and savory dishes. This little stone fruit is a superfood thanks to wellness-boosting properties like serotonin and melatonin. Their season is short, especially here in Western New York where we expect the harvest to last just a few weeks starting in early July. However, the U.S. is the second largest producer of cherries in the world. Storage and PreparationKeep the stems on and store unwashed cherries in a plastic bag in the refrigerator. Make sure to keep them cool as their flavor and texture degrade if they have been exposed to warmth. Ripe sweet cherries will last for 2-3 days in a plastic bag in the refrigerator. Wash cherries with cool water before use. Nutrition InfoCherries are good for us! They are rich in antioxidants and contains anti-inflammatory compounds that can help regulate body’s circadian rhythms. Sweet cherries are fat free and sodium free and a good source of vitamin C and potassium. They stabilize blood sugar, promote better sleep and post-workout recovery and reduce inflammation. Cooking Ideas
Arugula and Cherry Salad with Goat Cheese and Candied PecansIngredients
CANDIED PEPPER PECANS 1 cup pecans 1/4 cup maple syrup 1 teaspoon black pepper 1 teaspoon butter FRESH CHERRY BALSAMIC VINAIGRETTE 1/3 cup fresh BC pitted cherries, packed 3 tablespoons avocado oil (or another neutral flavored oil) 1 1/2 tablespoons white balsamic (or sub apple cider vinegar) A pinch of sea salt ARUGULA AND FRESH CHERRY SALAD 10 ounces baby arugula 2 cups pitted BC cherries, cut in half 2 ounces goat cheese (sub a diced avocado for paleo and vegan) Directions
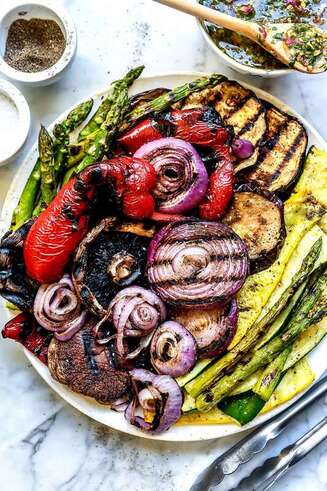 Bring some innovation to the backyard barbecue this holiday weekend. After all, that's the American way! Grilled watermelon, leafy greens pizzas and more can add an unexpected spark to your Fourth of July celebrations. Grilling enhances the natural sweetness of summer veggies while imparting a smoky flavor to their bite. Added to grain bowls and pasta salad or sandwiched between slices of sour dough with your favorite cheese, grilled vegetables make a healthy vegetarian main dish. There is a nearly endless number of vegetables that cook well on the grill. Grilling is also a great way to use up produce that is wilting or you don't want to eat raw. What's more, grilled vegetables are the best, healthiest way to grill! According to WebMD, produce is safe to grill because risk-potential PAHs and HCAs don’t form on grilled fruits and vegetables. There's no fat to render and drip onto the grilling element to cause the flare-ups that deposit those compounds back onto the food. Here's our line up for the best vegetables for grilling and suggested cooking times:
Let's get grillin'!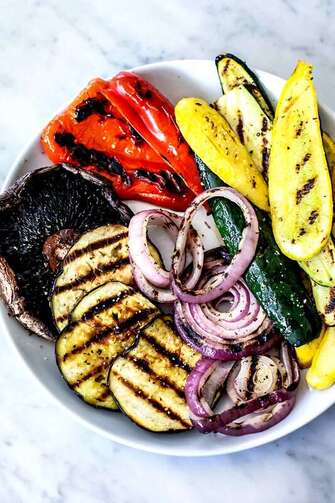 Follow these 5 techniques to become a veggie grill master: 1. Slice the vegetables the same thickness so they cook at the same rate. Use a handheld mandoline for zucchini, eggplant, and onion. Aim for slices that fall somewhere between 1/3″ and 1/2″. Slicing the veggies too thin will make them disintegrate on the grill. 2. Give your veggies a good oil down. Follow the golden rule of grilling: oil what you grill, not the grill itself. Drizzle the vegetables with olive oil then spread it evenly with your fingers. 3. Season simply. Sprinkle the vegetables somewhat generously with kosher salt and freshly ground black pepper. Add dried herbs such as oregano, mint, tarragon, or basil if you’d like. 4. Grill ’em up hot. Start your veggies over medium heat, about 350°F to 450°F. Lay long slices and asparagus or carrots crosswise over the grates so they don’t fall through. Close the grill lid and cook the vegetables undisturbed, flipping after 3-5 minutes. 5. Close the lid. Closing the lid of your grill creates the same environment as an oven, baking the vegetables as they lightly char. Remember to check the progress of your cooking half-way through cook times.
Grilled Pizza with Red Onion & FetaIngredients
1. Prepare a hot grill. Place the onions in a bowl and toss with 1 tablespoon of the olive oil and salt and pepper to taste. Place a perforated grill pan on the grill and let it get hot, then add the onions and cook, tossing in the pan or stirring with tongs, for about 3 to 5 minutes, just until they soften slightly and begin to char. Remove from the grill and return the onions to the bowl. 2. Oil the hot grill rack with olive oil, either by brushing with a grill brush or by dipping a folded wad of paper towels in olive oil and using tongs to rub the rack with it. Place a round of dough on a lightly dusted baker’s peel or rimless baking sheet. Slide the pizza dough from the peel or baking sheet onto the grill rack. If the dough has just come from the freezer and is easy to handle, you can just place it on the rack without bothering with the peel. Close the lid of the grill – the vents should be closed —-- and set the timer for 2 minutes. 3. Lift up the grill lid. The surface of the dough should display some big air bubbles. Using tongs, lift the dough to see if it is evenly browning on the bottom. Rotate the dough to assure even browning. Keep it on the grill, moving it around as necessary, until it is nicely browned, with grill marks. Watch closely so that it doesn’t burn. When it is nicely browned on the bottom (it may be blackened in spots), use tongs or a spatula to slide the dough onto the baking sheet or peel, and remove from the grill. Cover the grill again. 4. Make sure that there is still some flour on the peel or baking sheet and flip the dough over so that the uncooked side is now on the bottom. Brush the top lightly with oil, then top with a thin layer of tomato sauce (no more than 1/4¼ cup) and a layer of grilled sliced onions. Sprinkle with thyme and feta, and drizzle on a little more olive oil. Slide the pizza back onto the grill. If using a gas grill, reduce the heat to medium-high. Close the lid and cook for 2 to 3 more minutes, until the bottom is brown. Open the grill and check the pizza. The top should be hot and the bottom nicely browned. If the bottom is getting too dark but the pizza still needs a little more time, move it to a cooler part of the grill and close the top. Use a spatula or tongs to remove the pizza to a cutting board. Cut into wedges and serve. Repeat with the other two crusts. 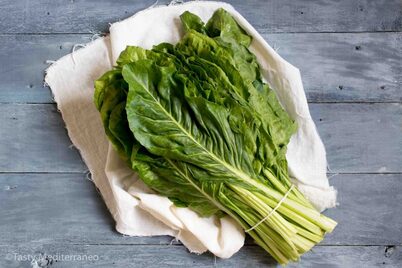 Mild, like spinach, Swiss Chard can be green, red or rainbow colored. Strong leaves and crisp stalks make it a terrific addition to stir-fry dishes or salads. We love using it as a low-carb, gluten free wrap for sandwiches. This leafy green is also an excellent substitute for kale or escarole in hearty soups, like Italian Wedding Soup, or frittatas. There are countless ways to use this veggie in your recipes. Don’t overcook! The brighter the green, the better it is for you and the more nutrients they contain. Storage and PreparationSelect chard with fresh green leaves. Avoid those that are yellow, discolored or torn. Store unwashed leaves in a plastic bag in the crisper for 2-3 days. To chop Swiss Chard, first fold each leaf in half with topside of the green folded inward. Cut along the stem and discard stem. Stack the greens and chop several at once. Once they are chopped the desired size, wash under cool running water just before using. In most cases you can eat chard stems in the same dish as the leaves. If the stalks are thick, finely chop them and start cooking them a little earlier so they become tender. Nutrition InfoSwiss Chard is high in Vitamin A, C and K. It is a good source of fiber, calcium, magnesium, copper, zinc, sodium, and phosphorus. This green is not only loaded with nutrients but also extremely low in calories and is fat- and cholesterol-free. Cooking Ideas
Swiss Chard Sandwich Wraps Say that five times fast! We encourage you to use your imagination when building your own chard sandwich but here are a few suggestions for a delicious and healthy lunch. This sandwich is great for picnics or your lunch box - no more soggy bread! Ingredients: - 1 bundle of Swiss Chard (washed + cut into wrap size pieces) - 2-3 slices of turkey breast (or shredded chicken, or tuna, or sliced beef, or pulled pork!! So many options here!) - Sliced tomato - Sliced avocado - 1 heaping tbsp of mayo or another condiment of your choice Instructions: Once you've washed and cut the perfect piece(s) of Swiss Chard assemble all ingredients in whatever order you choose. and enjoy! Italian Wedding SoupFrom Eat the Love This comforting soup is made with beef and sausage meatballs, greens, and tiny pasta. It's ready in about an hour from start to finish and we think its perfect any time of year! Ingredients Meatballs 3/4 pound ground beef 1/2 pound sweet Italian sausage bulk or removed from the casing 1/2 cup grated Parmesan cheese 1/3 cup Italian bread crumbs 1 large egg 3 tablespoons chopped chives 2 teaspoon fresh thyme leaves 2 cloves garlic minced 1/4 teaspoon kosher salt 1/4 teaspoon black pepper 2 tablespoon olive oil Soup 1 bunch Swiss Chard about 8 ounces 1 tablespoon olive oil 1 medium onion chopped 3 large carrots diced to 1/2-inch chunks 8 cups chicken stock 1 cup dry white wine or substitute 1 additional cup of chicken stock 1 bay leaf 1/2 teaspoon kosher salt 1/2 teaspoon black pepper 1 cup orzo pasta about 8 ounces or another small pasta To Finish Additional salt and pepper to taste Grated Parmesan cheese Directions
Swiss Chard and Potato FrittataFrom Fine Cooking
Adding potatoes to a frittata makes it filling enough for dinner, especially if paired with a green salad. This dish also makes a great appetizer and is tasty at room temperature. Ingredients 6 oz. Swiss Chard 2 Tbs. canola oil 1/2 tsp. finely chopped fresh rosemary 1 lb. Yukon Gold potatoes, peeled and grated (about 3 cups) 1/2 medium sweet onion, finely chopped Kosher salt and freshly ground black pepper 1 medium clove garlic, finely chopped 1/4 tsp. crushed red pepper flakes 10 large eggs 6 oz. grated aged Gouda (about 2 cups) Directions
|
Archives
August 2021
Categories
All
|
 RSS Feed
|
FreshFix
|