
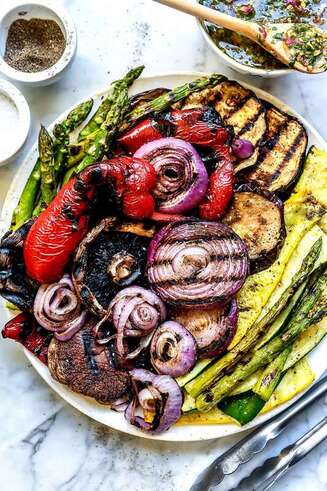
 Bring some innovation to the backyard barbecue this holiday weekend. After all, that's the American way! Grilled watermelon, leafy greens pizzas and more can add an unexpected spark to your Fourth of July celebrations. Grilling enhances the natural sweetness of summer veggies while imparting a smoky flavor to their bite. Added to grain bowls and pasta salad or sandwiched between slices of sour dough with your favorite cheese, grilled vegetables make a healthy vegetarian main dish. There is a nearly endless number of vegetables that cook well on the grill. Grilling is also a great way to use up produce that is wilting or you don't want to eat raw. What's more, grilled vegetables are the best, healthiest way to grill! According to WebMD, produce is safe to grill because risk-potential PAHs and HCAs don’t form on grilled fruits and vegetables. There's no fat to render and drip onto the grilling element to cause the flare-ups that deposit those compounds back onto the food. Here's our line up for the best vegetables for grilling and suggested cooking times:
Let's get grillin'!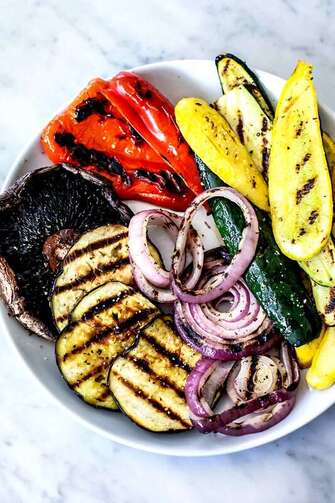 Follow these 5 techniques to become a veggie grill master: 1. Slice the vegetables the same thickness so they cook at the same rate. Use a handheld mandoline for zucchini, eggplant, and onion. Aim for slices that fall somewhere between 1/3″ and 1/2″. Slicing the veggies too thin will make them disintegrate on the grill. 2. Give your veggies a good oil down. Follow the golden rule of grilling: oil what you grill, not the grill itself. Drizzle the vegetables with olive oil then spread it evenly with your fingers. 3. Season simply. Sprinkle the vegetables somewhat generously with kosher salt and freshly ground black pepper. Add dried herbs such as oregano, mint, tarragon, or basil if you’d like. 4. Grill ’em up hot. Start your veggies over medium heat, about 350°F to 450°F. Lay long slices and asparagus or carrots crosswise over the grates so they don’t fall through. Close the grill lid and cook the vegetables undisturbed, flipping after 3-5 minutes. 5. Close the lid. Closing the lid of your grill creates the same environment as an oven, baking the vegetables as they lightly char. Remember to check the progress of your cooking half-way through cook times.
Grilled Pizza with Red Onion & FetaIngredients
1. Prepare a hot grill. Place the onions in a bowl and toss with 1 tablespoon of the olive oil and salt and pepper to taste. Place a perforated grill pan on the grill and let it get hot, then add the onions and cook, tossing in the pan or stirring with tongs, for about 3 to 5 minutes, just until they soften slightly and begin to char. Remove from the grill and return the onions to the bowl. 2. Oil the hot grill rack with olive oil, either by brushing with a grill brush or by dipping a folded wad of paper towels in olive oil and using tongs to rub the rack with it. Place a round of dough on a lightly dusted baker’s peel or rimless baking sheet. Slide the pizza dough from the peel or baking sheet onto the grill rack. If the dough has just come from the freezer and is easy to handle, you can just place it on the rack without bothering with the peel. Close the lid of the grill – the vents should be closed —-- and set the timer for 2 minutes. 3. Lift up the grill lid. The surface of the dough should display some big air bubbles. Using tongs, lift the dough to see if it is evenly browning on the bottom. Rotate the dough to assure even browning. Keep it on the grill, moving it around as necessary, until it is nicely browned, with grill marks. Watch closely so that it doesn’t burn. When it is nicely browned on the bottom (it may be blackened in spots), use tongs or a spatula to slide the dough onto the baking sheet or peel, and remove from the grill. Cover the grill again. 4. Make sure that there is still some flour on the peel or baking sheet and flip the dough over so that the uncooked side is now on the bottom. Brush the top lightly with oil, then top with a thin layer of tomato sauce (no more than 1/4¼ cup) and a layer of grilled sliced onions. Sprinkle with thyme and feta, and drizzle on a little more olive oil. Slide the pizza back onto the grill. If using a gas grill, reduce the heat to medium-high. Close the lid and cook for 2 to 3 more minutes, until the bottom is brown. Open the grill and check the pizza. The top should be hot and the bottom nicely browned. If the bottom is getting too dark but the pizza still needs a little more time, move it to a cooler part of the grill and close the top. Use a spatula or tongs to remove the pizza to a cutting board. Cut into wedges and serve. Repeat with the other two crusts.
0 Comments
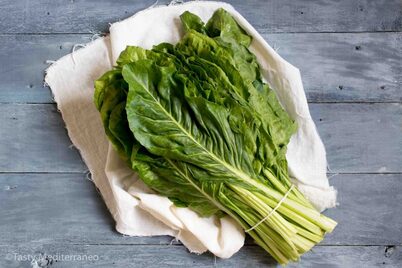 Mild, like spinach, Swiss Chard can be green, red or rainbow colored. Strong leaves and crisp stalks make it a terrific addition to stir-fry dishes or salads. We love using it as a low-carb, gluten free wrap for sandwiches. This leafy green is also an excellent substitute for kale or escarole in hearty soups, like Italian Wedding Soup, or frittatas. There are countless ways to use this veggie in your recipes. Don’t overcook! The brighter the green, the better it is for you and the more nutrients they contain. Storage and PreparationSelect chard with fresh green leaves. Avoid those that are yellow, discolored or torn. Store unwashed leaves in a plastic bag in the crisper for 2-3 days. To chop Swiss Chard, first fold each leaf in half with topside of the green folded inward. Cut along the stem and discard stem. Stack the greens and chop several at once. Once they are chopped the desired size, wash under cool running water just before using. In most cases you can eat chard stems in the same dish as the leaves. If the stalks are thick, finely chop them and start cooking them a little earlier so they become tender. Nutrition InfoSwiss Chard is high in Vitamin A, C and K. It is a good source of fiber, calcium, magnesium, copper, zinc, sodium, and phosphorus. This green is not only loaded with nutrients but also extremely low in calories and is fat- and cholesterol-free. Cooking Ideas
Swiss Chard Sandwich Wraps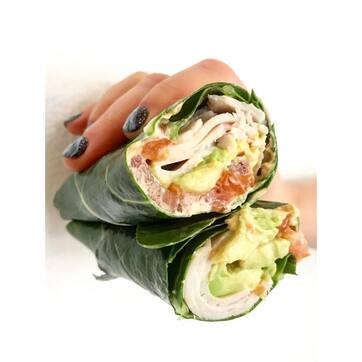 Say that five times fast! We encourage you to use your imagination when building your own chard sandwich but here are a few suggestions for a delicious and healthy lunch. This sandwich is great for picnics or your lunch box - no more soggy bread! Ingredients: - 1 bundle of Swiss Chard (washed + cut into wrap size pieces) - 2-3 slices of turkey breast (or shredded chicken, or tuna, or sliced beef, or pulled pork!! So many options here!) - Sliced tomato - Sliced avocado - 1 heaping tbsp of mayo or another condiment of your choice Instructions: Once you've washed and cut the perfect piece(s) of Swiss Chard assemble all ingredients in whatever order you choose. and enjoy! Italian Wedding SoupFrom Eat the Love This comforting soup is made with beef and sausage meatballs, greens, and tiny pasta. It's ready in about an hour from start to finish and we think its perfect any time of year! Ingredients Meatballs 3/4 pound ground beef 1/2 pound sweet Italian sausage bulk or removed from the casing 1/2 cup grated Parmesan cheese 1/3 cup Italian bread crumbs 1 large egg 3 tablespoons chopped chives 2 teaspoon fresh thyme leaves 2 cloves garlic minced 1/4 teaspoon kosher salt 1/4 teaspoon black pepper 2 tablespoon olive oil Soup 1 bunch Swiss Chard about 8 ounces 1 tablespoon olive oil 1 medium onion chopped 3 large carrots diced to 1/2-inch chunks 8 cups chicken stock 1 cup dry white wine or substitute 1 additional cup of chicken stock 1 bay leaf 1/2 teaspoon kosher salt 1/2 teaspoon black pepper 1 cup orzo pasta about 8 ounces or another small pasta To Finish Additional salt and pepper to taste Grated Parmesan cheese Directions
Swiss Chard and Potato FrittataFrom Fine Cooking
Adding potatoes to a frittata makes it filling enough for dinner, especially if paired with a green salad. This dish also makes a great appetizer and is tasty at room temperature. Ingredients 6 oz. Swiss Chard 2 Tbs. canola oil 1/2 tsp. finely chopped fresh rosemary 1 lb. Yukon Gold potatoes, peeled and grated (about 3 cups) 1/2 medium sweet onion, finely chopped Kosher salt and freshly ground black pepper 1 medium clove garlic, finely chopped 1/4 tsp. crushed red pepper flakes 10 large eggs 6 oz. grated aged Gouda (about 2 cups) Directions
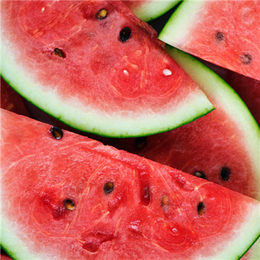 Is there another fruit that announces summer's arrival quite like the watermelon? Believed to have originated in the Kalahari Desert of Africa, were often placed in the burial tombs of Egyptian kings to nourish them in the afterlife. You don’t need to be royalty to enjoy this ancient melon on a hot day. By weight, watermelon is the most consumed melon in the U.S., followed by cantaloupe and honeydew. This annual is grown in favorable climates from tropical to temperate regions worldwide for its large edible fruit, which is a berry with a hard rind and no internal divisions. The sweet, juicy flesh is usually deep red to pink, with many black seeds, although seedless varieties exist. Watermelon flesh can be eaten raw or pickled, and the rind is edible after cooking. Even the seeds, which have a nutty flavor, can be dried and roasted. The fruit is also commonly consumed as a juice or as an ingredient in mixed beverages. We love adding a couple cubes to ice water for a boost of flavor and vitamins. Storage and PreparationUncut watermelon is best stored outside of the fridge as cold temperatures can cause damage to the flesh and affect the flavor. Cut watermelon should be stored in sealed container in the fridge and used within 5 days. Scrub the watermelon before cutting. Start by cutting off the ends to give the melon a base of support. Take a large sharp knife at an angle, set it where the white rind meets the red flesh on the top of the cut watermelon, begin to cut the rind off. Using the rind as a guide, continue to cut off until the watermelon is rind free. Trim any excess rind from the watermelon and cut it up into strips, cubes, or you can even leave the rind on and cut in triangles! Nutrition InfoWatermelon is rich in water and electrolytes, making it a great snack during the summer heat. They are a good source of vitamin A, vitamin B6, vitamin C, and thiamine. Watermelon is also an excellent source of antioxidants, particularly lycopene (a compound also found in tomatoes). Antioxidants help prevent damage to cells in the body. Cooking Ideas
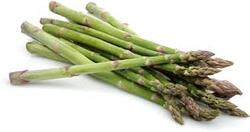 Asparagus is a spring perennial with a distinct flavor. Only young asparagus shoots are commonly eaten. Once the buds start to open, the shoots quickly turn woody. A member of the lily family, asparagus is grown from a crown planted about a foot deep in soil. Asparagus spears cannot be harvested until the plant is at least three years old. These hearty plants will produce spears for up to 15 years. A fully mature asparagus plant can grow spears up to 10 inches in length in just 24 hours.! This green vegetable, which can be cultivated to grow purple or white stems, is perfect for any meal. We love serving it for breakfast topped with an over easy egg! Storage and PreperationSnap off the bottom inch or so using your fingers; the stems will naturally break where the tough woody part ends and the tender stem begins. Gently bend the stems a few times to find a place where it breaks easily. You can also line up the stems and trim off an inch or so. If desired, scrape off the scales with a vegetable peeler. Rinse the spears under cool water to remove any grit. Pat dry and wrap the bottoms of the spears in a damp paper towel. Place is a plastic bag and store in the vegetable crisper for 2-4 days. Nutrition InfoAsparagus is low in calories and sodium and high in fiber. This nutrient dense vegetable contains vitamin C, vitamin B6 and thiamin. It is especially high in folic acid. One cup of cooked asparagus contains 264 micrograms of folate or 66% of the daily recommended intake. Folic acid is Folate is an essential nutrient, and is necessary for fetal development, blood cell formation and normal cellular function. Cooking Ideas
|
Archives
August 2021
Categories
All
|
 RSS Feed
|
FreshFix
|